


Editorial
How to change screen resolution in Windows
Learn how to easily change screen resolution in Windows. Our guide covers multiple methods for optimizing your display settings for clarity and comfort.
Is your screen looking a bit blurry, overly zoomed-in, or just off in some way? You might be dealing with a screen resolution that’s not quite right. The good news? Changing your screen resolution in Windows is a pretty straightforward process. Whether you’re working, browsing, or gaming, a well-optimized display can really make a difference. This guide will walk you through several ways to tweak your display settings so everything looks just right.
What is Screen Resolution?
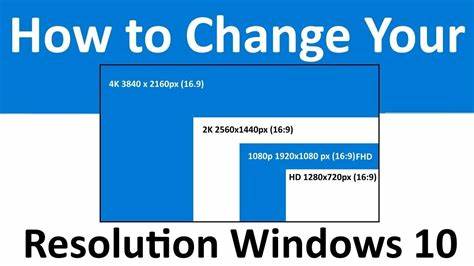
Before jumping into the how-to, it helps to know what screen resolution actually means. Essentially, it’s the number of pixels—those tiny dots—that your screen displays, measured as width x height (like 1920 x 1080). Higher resolution means more pixels, which usually translates to sharper images and more room on your screen. Lower resolution means fewer pixels, so everything looks bigger.
The “recommended” resolution is typically your display’s native resolution—basically, the actual number of pixels your screen was built to show. Sticking to that setting generally gives you the clearest results. But there are times when changing it might make sense—maybe you want larger text, or you’re troubleshooting something weird going on with your display.
Method 1: Change Screen Resolution via Display Settings (Windows 10/11)
This is the go-to method for most users. It’s simple and gets the job done.
Step-by-Step Guide:
- Right-click on an empty spot on your desktop.
- From the menu that pops up, click “Display settings.” That’ll open up the Settings app right to the Display section.
- Expert Tip: You can also go through Start > Settings > System > Display.
- Scroll down until you see the “Scale & layout” section.
- Under “Display resolution,” click the dropdown menu.
- You’ll see a list of available resolutions. The one labeled “Recommended” is usually your best bet.
- Pick the resolution you want.
- Your screen will probably flicker or go black for a second. Then a box will pop up asking if you want to “Keep changes” or “Revert.”
- You’ve got about 15 seconds to click “Keep changes” before it switches back automatically. This helps prevent issues if the new resolution doesn’t work with your monitor.
- Happy with the new look? Click “Keep changes.” If not, go with “Revert” or just wait it out.
Method 2: Change Screen Resolution Using Graphics Card Control Panel
If your computer has a dedicated graphics card from NVIDIA, AMD, or Intel, you might prefer using their specific software for more advanced tweaks.
For NVIDIA Users:
- Right-click on your desktop.
- Choose “NVIDIA Control Panel.”
- Navigate to “Display” > “Change resolution” on the left side.
- Under “Resolution,” pick your preferred setting. You might also see refresh rate options here.
- Click “Apply” and confirm the changes.
For AMD Users (Radeon Software):
- Right-click on your desktop.
- Choose “AMD Radeon Software” (or similar).
- Go to the “Display” tab.
- Under “Display Resolution,” select your preferred resolution.
- Confirm when prompted.
For Intel Users:
- Right-click on your desktop.
- Select either “Intel Graphics Command Center” or “Intel Graphics Settings.”
- Navigate to the “Display” or “Resolution” section.
- Choose the resolution you want.
- Apply and confirm.
Method 3: Troubleshooting Resolution Issues
Sometimes things don’t go as smoothly. Here are a few hiccups you might run into and how to fix them:
Resolution Options Are Grayed Out or Missing
- Update Graphics Drivers:
- Go to Start and type “Device Manager.”
- Expand “Display adapters.”
- Right-click your graphics card and select “Update driver.”
- Choose “Search automatically for drivers.” Or visit your graphics card maker’s website (NVIDIA, AMD, Intel) for the latest version.
- Check Monitor Connection: Make sure your cable (HDMI, DisplayPort, etc.) is firmly plugged in on both ends.
- Restart Your PC: Sometimes a reboot is all it takes.
Screen Goes Black or Says “Out of Range”
- If the new resolution isn’t supported, your screen might go black. Don’t worry—Windows usually reverts after 15 seconds. If it doesn’t, try booting into Safe Mode (press F8 or Shift + Restart repeatedly before Windows loads) and set a compatible resolution.
Incorrect Aspect Ratio
- If your display looks stretched or squished, it might be an aspect ratio mismatch. Adjusting the resolution usually fixes this, but you might also need to tweak your monitor’s settings using its physical buttons.
When to Change Your Screen Resolution
While the “Recommended” setting works for most, there are times when changing it makes sense:
- Making Text and Icons Larger: If things are too small, lowering the resolution can help. Or use the “Scale” option to make elements bigger without changing resolution.
- Troubleshooting Display Glitches: Odd behaviors like flickering can sometimes be fixed by changing resolutions.
- Gaming: Some games run smoother at lower resolutions, or you might prefer it for better performance.
- Using External Monitors or Projectors: You might need to match their native resolution for the best display.
Changing your screen resolution is a basic skill that can have a surprisingly big impact on your overall computing experience. With just a few clicks, you can make your screen clearer, more comfortable, and better suited to whatever you’re doing. Whether you’re adjusting things for work, play, or just personal comfort, it’s worth knowing how to get it right.