Tech
How to Map a Network Drive in Windows
Learn how to map a network drive in Windows 10 and 11 using File Explorer, Command Prompt, or PowerShell with this step-by-step guide.
Mapping a network drive in Windows allows you to access shared folders or drives on another computer or server as if they were on your own machine. This is particularly useful in office environments, for collaborative projects, or when accessing files stored on a network-attached storage (NAS) device.
In this guide, we’ll walk through the steps to map a network drive in Windows 10 and Windows 11, ensuring a seamless connection to shared resources.
Prerequisites
Before mapping a network drive, ensure the following:
- Network Connectivity: Both your computer and the target device (another PC or server) should be connected to the same network.
- Shared Folder: The folder you intend to access must be shared on the target device with the appropriate permissions.
- Credentials: You may need the username and password for the target device, especially if it’s protected.
Mapping a Network Drive Using File Explorer
Windows 10
- Open File Explorer: Click on the folder icon in the taskbar or press Windows + E.
- Access ‘This PC’: In the left pane, select This PC.
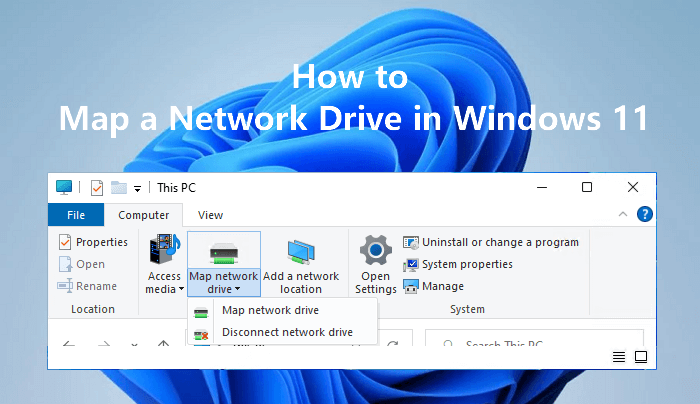
- Initiate Mapping: Click on the Computer tab at the top, then select Map network drive.
- Assign Drive Letter: Choose an available drive letter from the dropdown menu.
- Specify Folder Path: In the Folder field, enter the network path of the shared folder (e.g., \\ComputerName\SharedFolder). You can also click Browse to locate the folder.
- Set Preferences:
- Reconnect at sign-in: Check this box if you want the drive to reconnect automatically each time you log in.
- Connect using different credentials: Check this if you need to use a different username and password.
- Finish: Click Finish. If prompted, enter the required credentials.
Windows 11
- Open File Explorer: Click on the folder icon in the taskbar or press Windows + E.
- Access ‘This PC’: In the left pane, select This PC.
- Initiate Mapping: Click on the … (More) button at the top, then select Map network drive.
- Assign Drive Letter: Choose an available drive letter from the dropdown menu.
- Specify Folder Path: In the Folder field, enter the network path of the shared folder (e.g., \\ComputerName\SharedFolder). You can also click Browse to locate the folder.
- Set Preferences:
- Reconnect at sign-in: Check this box if you want the drive to reconnect automatically each time you log in.
- Connect using different credentials: Check this if you need to use a different username and password.
- Finish: Click Finish. If prompted, enter the required credentials.
Mapping a Network Drive Using Command Prompt
For those who prefer using the command line:
- Open Command Prompt: Press Windows + R, type cmd, and press Enter.
- Use the ‘net use’ Command:
pgsql
CopyEdit
net use [DriveLetter]: \\ComputerName\SharedFolder /user:Username Password
Replace [DriveLetter] with your chosen drive letter, ComputerName with the name of the target computer, SharedFolder with the name of the shared folder, Username with your username, and Password with your password.
Example:
bash
CopyEdit
net use Z: \\Server01\Documents /user:JohnDoe mypassword
- Persistent Connection: To make the connection persistent across reboots, add the /persistent:yes flag:
bash
CopyEdit
net use Z: \\Server01\Documents /user:JohnDoe mypassword /persistent:yes
Mapping a Network Drive Using PowerShell
PowerShell offers a more script-friendly approach:
- Open PowerShell: Press Windows + X and select Windows PowerShell or Windows Terminal.
- Use the ‘New-PSDrive’ Cmdlet:
pgsql
CopyEdit
New-PSDrive -Name “Z” -PSProvider FileSystem -Root “\\ComputerName\SharedFolder” -Persist -Credential Get-Credential
This command will prompt you to enter your credentials.
Troubleshooting Tips
- Ensure Network Discovery is Enabled: Go to Control Panel > Network and Sharing Center > Advanced sharing settings and turn on network discovery.
- Check Permissions: Ensure that the shared folder has the appropriate permissions set for your user account.
- Firewall Settings: Verify that your firewall isn’t blocking file and printer sharing.
- Correct Path: Double-check the network path for typos.
- Credential Issues: If you’re having trouble with credentials, try accessing the shared folder directly via \\ComputerName\SharedFolder in File Explorer to test the connection.
Conclusion
Mapping a network drive in Windows is a straightforward process that enhances accessibility to shared resources within a network. Whether you’re collaborating in an office setting or accessing files on a home server, this feature streamlines your workflow by integrating network locations directly into your file system.


